Capped Soil Method (Dirted Tank) Guide
Quick Summary
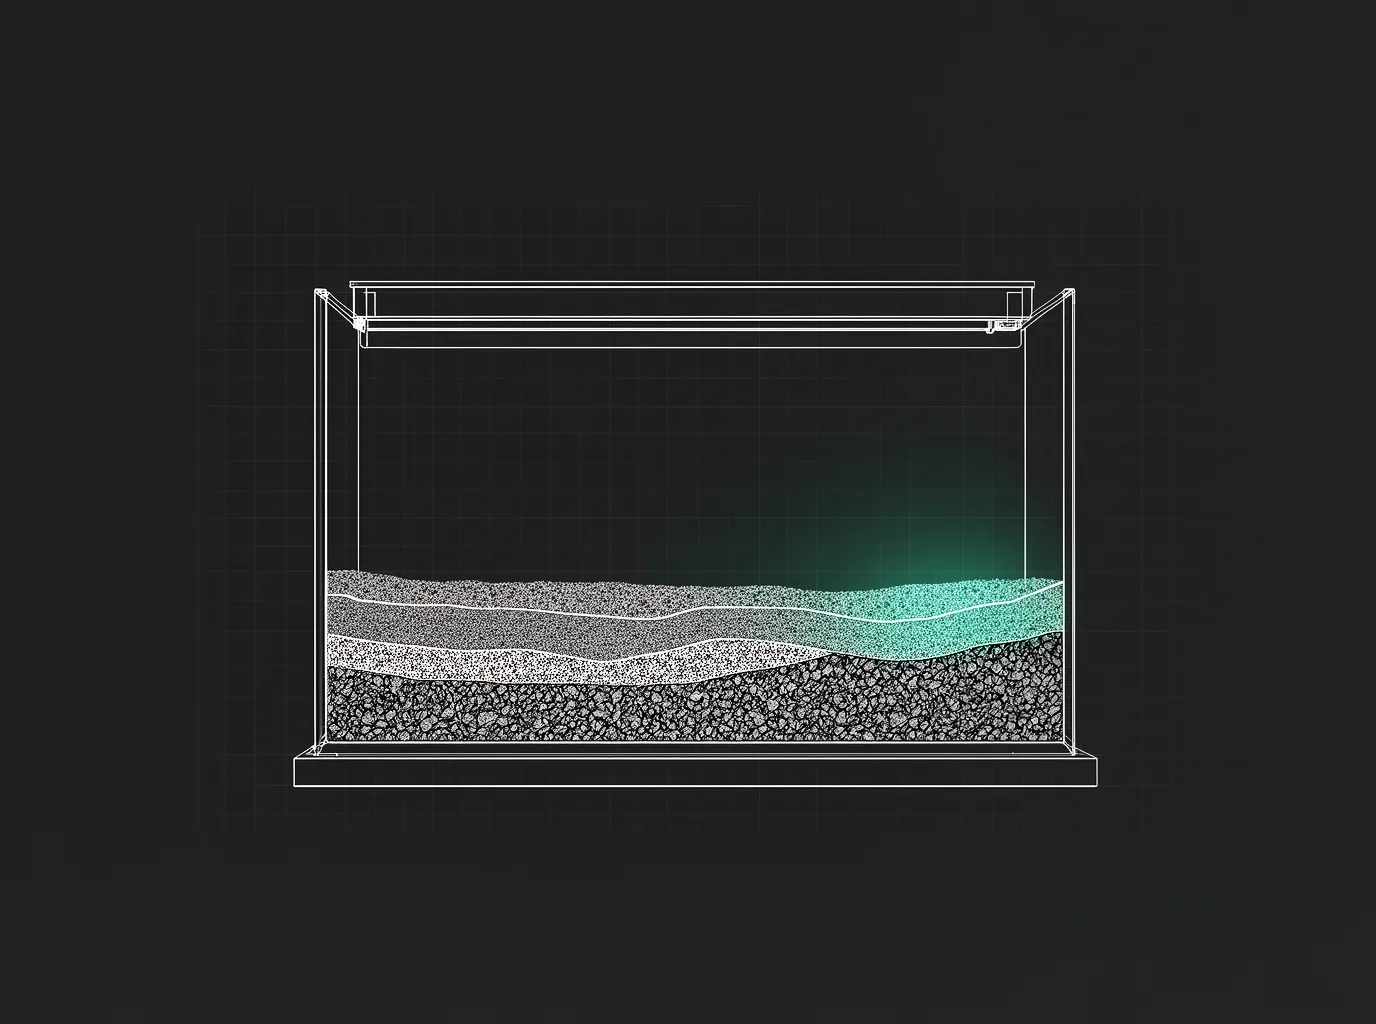
The capped soil method uses a layer of nutrient-rich organic soil at the bottom of the tank, sealed beneath an inert cap of gravel or sand. It is one of the oldest and most cost-effective ways to build a planted tank with a nutrient-rich root zone. The soil provides long-lasting macro and micronutrients directly to plant roots, while the cap prevents the soil from clouding the water and keeps the tank looking clean.
Dirted tanks can produce exceptional plant growth for years with minimal fertilization. They are popular with low-tech setups because the soil supplies nitrogen, phosphorus, potassium, and trace elements without the ongoing cost of commercial aqua soils or heavy dosing routines. The tradeoff is a more involved setup process and a substrate that cannot be easily rearranged once established.
What Is the Capped Soil Method?
Most aquarists discover the capped soil method after pricing out commercial aqua soils and realizing that organic potting soil can deliver similar (or better) long-term nutrition at a fraction of the cost. The concept is straightforward: a 2 to 3 cm layer of soil goes on the bottom, and a 2 to 3 cm cap of gravel or sand goes on top.
The soil layer is the nutrient engine. It slowly releases nitrogen compounds, phosphorus, potassium, iron, and dozens of trace elements through decomposition and mineralization. Plant roots grow down into the soil and feed directly from this reservoir.
The cap serves three purposes. It physically contains the soil so it does not cloud the water column. It provides a clean, stable surface for planting and maintenance. And it creates a buffer zone that slows the rate at which soil nutrients leach into the water, preventing sudden nutrient spikes that could trigger algae.
This method was popularized by Diana Walstad in her book "Ecology of the Planted Aquarium" and is sometimes called the Walstad method when paired with her broader approach to low-tech, balanced planted tanks.
Choosing the Right Soil
Not all soils are suitable for aquarium use. In most cases, the wrong soil choice is the primary reason dirted tanks fail in the first month.
What to Look For
Use organic potting soil or topsoil with these characteristics:
- No added fertilizers (especially slow-release granules or chemical NPK blends)
- No perlite or vermiculite (these float and work their way through the cap over time)
- No pesticides, herbicides, or wetting agents
- Minimal wood chips or bark (large organic chunks decompose slowly and produce tannins and gas)
The ingredient list should be simple: composted organic matter, possibly some peat, and little else. Miracle-Gro Organic Choice and similar basic organic potting soils have been used successfully by thousands of aquarists, provided you avoid their fertilizer-enriched product lines.
What to Avoid
Soils with slow-release fertilizer pellets (small colored beads) will cause severe ammonia and nutrient spikes. If you have ever set up a dirted tank and experienced persistent cloudy water and ammonia readings for weeks beyond what cycling explains, embedded fertilizer is almost always the cause.
Garden soil from your yard is unpredictable. It may contain pesticide residues, weed seeds, clay with unknown mineral content, or organisms that do not belong in an aquarium. Some aquarists use yard soil successfully after extensive preparation, but for most people, a bag of clean organic potting soil is safer and more consistent.
Mineralizing Soil (Optional)
Some aquarists mineralize their soil before use to reduce the initial nutrient burst and gas production. The process involves spreading the soil in a thin layer, soaking it, letting it dry completely, and repeating 3 to 5 times over several weeks.
Mineralization breaks down the most volatile organic compounds before they enter the tank. The result is a soil that releases nutrients more gradually and produces less initial cloudiness and fewer gas bubbles. In practice, mineralization is most valuable for aquarists who plan to add fish quickly after setup. If you are willing to run a longer fishless cycle (4 to 6 weeks), unmineralized soil is perfectly viable.
Choosing the Right Cap
The cap material is just as important as the soil. A poor cap allows soil to escape, creating persistent cloudiness that can take weeks to resolve.
Gravel Cap
Gravel (2 to 4 mm grain size) is the most common and reliable cap material. It is heavy enough to stay in place, large enough to work around during planting, and porous enough to allow some gas exchange between the soil layer and the water column.
Use rounded or smooth gravel rather than sharp, angular chips. Coarse gravel (above 5 mm) leaves gaps between particles that allow soil to work through, especially during planting or when bottom-dwelling fish dig. Fine gravel (2 to 3 mm) provides the best seal while still allowing root penetration.
Sand Cap
Sand creates a tighter seal over the soil but introduces compaction risks. Fine sand (under 1 mm) can pack so tightly that gas from decomposing soil gets trapped beneath it. You will often notice bubbles accumulating under a sand cap in the first few weeks. If these bubbles release suddenly (during planting or from fish disturbance), they can bring soil particles into the water column.
If you prefer the look of sand, use a medium grain size (1 to 2 mm) and keep the cap at 2 to 3 cm. Malaysian Trumpet Snails are especially helpful with sand caps because their burrowing prevents compaction and allows gas to escape gradually rather than building up.
How Deep Should the Cap Be?
The minimum effective cap depth is 2 cm. Below this, any disturbance from planting, water changes, or fish activity will expose the soil. For most setups, 2.5 to 3 cm is the sweet spot. It provides a secure seal, allows comfortable planting depth, and keeps total substrate height manageable.
Going above 3 cm for the cap alone is usually unnecessary and adds depth that contributes to anaerobic risks when combined with the soil layer beneath.
Step-by-Step Setup
Setting up a dirted tank is more involved than pouring in aqua soil or gravel, but the process is straightforward if you follow the sequence.
Before you begin, gather your materials: organic soil (screened for debris), cap material, a spray bottle, and a plate or shallow bowl for filling.
Step 1: Prepare the Soil
Spread the soil on a tray or plastic sheet and remove any large wood pieces, bark, sticks, perlite beads, or clumps. You want a consistent, fine-textured soil with no chunks larger than a few millimeters.
If mineralizing, begin the wet-dry cycle at least 2 to 3 weeks before your planned setup date. If using unmineralized soil, proceed directly to the next step.
Step 2: Add the Soil Layer
Place 2 to 3 cm of prepared soil evenly across the tank bottom. Lightly mist with a spray bottle to dampen the soil and help it settle. Do not flood the tank yet.
Avoid mounding the soil. Uneven soil thickness creates areas where the cap is too thin (soil exposure risk) or where total depth becomes excessive. A flat, uniform soil layer is the foundation of a clean dirted setup.
Step 3: Add the Cap
Gently pour or spoon the cap material over the dampened soil. Work slowly. Dumping cap material aggressively will mix it into the soil layer, defeating the purpose of separation. Build up the cap to 2 to 3 cm, smoothing it gently without pressing down hard enough to compress the soil beneath.
Step 4: Add Hardscape
Place rocks, driftwood, and any structural elements before filling with water. Pushing hardscape into the substrate after filling will disturb both layers and almost certainly cloud the water.
Step 5: Fill Slowly
Place a plate, shallow bowl, or plastic bag on the substrate surface. Pour water slowly onto this buffer so it disperses gently rather than blasting into the cap. Even with careful filling, some initial cloudiness is normal. It typically clears within 24 to 48 hours with filtration running.
If the water remains heavily clouded after 48 hours, the cap may be too thin in spots or soil may be escaping through gaps. Adding a thin additional layer of cap material over the problem areas usually resolves this.
Step 6: Plant Heavily
Dirted tanks benefit from heavy planting at setup. Plants immediately begin consuming the nutrients the soil releases, which reduces the risk of algae during the initial cycling period. Fast-growing stem plants (Hornwort, Water Wisteria, Hygrophila) are especially useful as nutrient sinks during the first month.
In practice, the more plants you add at setup, the smoother the first few weeks will be. Sparse planting in a dirted tank almost always leads to an algae bloom because the nutrient release has nowhere to go.
Step 7: Cycle Before Adding Fish
Even with plants absorbing nutrients, a dirted tank will produce ammonia from the decomposing organic matter in the soil. Run a fishless cycle (typically 3 to 6 weeks) and confirm that ammonia and nitrite read zero before adding livestock.
Benefits of the Capped Soil Method
The dirted tank approach has genuine advantages that explain its enduring popularity despite being one of the simplest substrate methods available.
Long-lasting nutrient supply. A well-prepared soil bed can feed plants for 3 to 5 years or longer. This far exceeds the 12 to 24 month nutrient lifespan of most commercial aqua soils. Over time, fish waste and detritus also accumulate in the soil layer, continuously replenishing its nutrient content.
Extremely low cost. A bag of organic potting soil costs $5 to $10 and provides enough material for multiple tanks. Combined with inexpensive gravel, the total substrate cost for a dirted tank is often under $20, compared to $50 to $90 for commercial aqua soil in the same tank.
Ideal for low-tech setups. Because the soil provides a steady baseline of nutrients, dirted tanks require minimal or no liquid fertilization. This makes them particularly well-suited for low-tech tanks without CO2 injection, where the moderate growth rate matches the moderate nutrient release.
Natural biological processes. The soil layer supports diverse microbial communities that process organic waste, cycle nutrients, and contribute to overall tank stability. In a mature dirted tank, the substrate functions as a self-sustaining ecosystem that requires very little intervention.
Common Problems and How to Avoid Them
Most dirted tank failures happen in the first month and are caused by the same handful of mistakes. Knowing what to expect prevents most of them.
Persistent Cloudy Water
If the water stays cloudy beyond the first 48 hours, soil is escaping through the cap. The usual causes are a cap that is too thin (under 2 cm), cap material that is too coarse (gaps between particles), or aggressive planting that breached the cap layer.
The fix is adding more cap material over the exposed areas. Do this carefully to avoid making the problem worse. In severe cases, a fine filter sock or polishing pad on the filter intake will clear suspended soil particles within a day or two.
Excessive Gas Bubbles
Decomposing organic matter in the soil produces gases (nitrogen, methane, and occasionally hydrogen sulfide). In the first few weeks, bubbles rising from the substrate are normal and expected. They should decrease as the most volatile organic compounds break down.
If gas production continues heavily beyond the first month, the soil may have contained too much undecomposed organic material. This is where mineralization beforehand makes the biggest difference. For an already-established tank, gently poking the substrate with a chopstick in problem areas helps trapped gas escape gradually rather than building up.
Ammonia Spikes
Fresh organic soil releases ammonia as it decomposes. This is expected and is why cycling is mandatory before adding fish. If ammonia remains elevated beyond 4 to 6 weeks, the soil may be excessively rich or may have contained fertilizer additives.
Heavy planting and regular water changes during cycling manage this effectively. In most tanks, ammonia peaks in week 1 to 2 and drops to zero by week 4 to 6.
Algae Bloom During Cycling
The nutrient-rich environment of a new dirted tank is ideal for algae. Green water, diatoms, and hair algae are all common in the first month. This is not a sign of failure. It is a nutrient surge that stabilizes once plants establish and begin outcompeting algae for resources.
Floating plants (Duckweed, Salvinia, Frogbit) are highly effective at absorbing excess nutrients and shading the tank during this period. Remove them once the tank stabilizes if you do not want them long-term.
Difficulty Replanting
Once a dirted tank is established, pulling up and replanting disrupts the cap and can expose soil. This makes rescaping difficult. If you have ever tried to rearrange plants in a mature dirted tank, you know the frustration of seeing a soil cloud billow up after removing a single stem.
Plan your layout carefully before setup. Dirted tanks reward patience and commitment to the original design. If you are someone who rescapes frequently, aqua soil or fertilized gravel may be a better fit.
Best Plants for Dirted Tanks
Almost any planted tank species thrives in a dirted setup, but some take particular advantage of the rich root zone.
Root-feeding plants benefit the most. Cryptocoryne species develop massive root networks in soil and grow larger and more colorful than in inert substrates. Amazon Swords (Echinodorus) and Vallisneria spread aggressively when their roots reach the soil layer. These heavy feeders are the best demonstration of what a dirted tank can do.
Stem plants like Ludwigia, Rotala, and Hygrophila grow rapidly and help absorb excess nutrients during the critical first months. They are valuable both as permanent residents and as temporary nutrient sinks during cycling.
Carpet plants work in dirted tanks but require a thin enough cap for their fine roots to reach the soil. Monte Carlo and Dwarf Hairgrass can carpet successfully if the cap is 2 cm or less in the carpeting zone. HC Cuba is more demanding and may struggle if the cap prevents root access to the soil layer.
Epiphytes like Anubias and Java Fern grow fine in dirted tanks but do not benefit from the soil since they feed from the water column. They are worth including for aesthetics but will not take advantage of the substrate investment.
Advanced: How Soil Chemistry Differs from Aqua Soil
Commercial aqua soils and organic potting soil both provide nutrients, but through different mechanisms. The distinction matters for understanding long-term performance.
Aqua soil is manufactured with a defined nutrient charge baked into fired clay granules. It releases nutrients through cation exchange: ions are held on charged sites within the clay and released as plant roots draw them out. This process is relatively predictable and exhausts as the exchange sites deplete, typically within 12 to 24 months.
Organic soil releases nutrients primarily through biological decomposition. Microorganisms break down organic matter continuously, releasing nitrogen, phosphorus, and micronutrients as byproducts of their metabolism. This process is self-renewing to a degree, because new organic matter (fish waste, dead plant material, detritus) continually enters the soil and feeds the microbial community.
This is why dirted tanks maintain their nutrient supply far longer than aqua soil tanks. The soil is not a fixed battery that depletes. It is a living system that processes and recycles nutrients over time. In practice, a healthy dirted tank often becomes more productive in its second and third year as the soil microbial community matures and stabilizes.
The tradeoff is less predictability. Aqua soil delivers a consistent, controlled nutrient output. Soil nutrient release varies with temperature, microbial activity, organic content, and water chemistry. This variability is rarely a problem in planted tanks (plants are adaptable), but it does mean that soil-based setups are harder to dial in with the precision that high-tech aquascapers sometimes want.
Advanced: Anaerobic Zones in Dirted Tanks
Every dirted tank develops some degree of anaerobic activity in the soil layer. This is normal and, in moderation, beneficial.
The soil layer sits beneath a cap that restricts oxygen flow. The upper portion of the soil remains mildly oxygenated by plant roots and diffusion through the cap. The deeper soil becomes anaerobic over time. In this anaerobic zone, denitrifying bacteria convert nitrate to nitrogen gas, providing a natural pathway for nitrate reduction.
This explains why many mature dirted tanks maintain consistently low nitrate levels without heavy water changes. The substrate itself is processing nitrate that would otherwise accumulate.
Problems only arise when anaerobic activity becomes excessive. If the soil layer is too thick (above 3 cm), decomposition produces hydrogen sulfide faster than it can be neutralized. If the cap is too tight (fine sand, compacted), gases cannot escape gradually. The combination of thick soil and tight cap is what causes the worst outcomes in dirted tanks.
Keeping the soil layer at 2 to 3 cm and using a moderately porous cap (2 to 4 mm gravel) prevents problematic anaerobic buildup in the vast majority of setups.
Common Myths
"Dirted tanks are dirty and cloudy." A properly capped dirted tank is visually indistinguishable from any other planted tank after the first week. The cloudiness during setup is temporary and clears quickly with filtration. Long-term water clarity depends on cap integrity, not the presence of soil.
"You need to mineralize soil or the tank will fail." Mineralization reduces the initial nutrient burst but is not required. Thousands of successful dirted tanks use unmineralized soil. The key is cycling the tank before adding fish and planting heavily at setup. Mineralization is a convenience, not a necessity.
"Dirted tanks cannot be used with CO2 injection." They can. CO2 accelerates plant growth, which increases nutrient demand and pulls more from the soil layer. High-tech dirted tanks grow plants aggressively. The only consideration is that faster growth may deplete the soil nutrients sooner, potentially requiring supplemental fertilization earlier than in a low-tech setup.
"You have to tear down a dirted tank every year." Dirted tanks can run for 5 years or longer without teardown. The soil nutrient supply is replenished by fish waste and detritus. As long as the cap remains intact and plants are growing, there is no inherent expiration on a dirted substrate.
FAQ
Can I use any potting soil for a dirted tank?
No. Use organic potting soil or topsoil without added fertilizers, perlite, vermiculite, or pesticides. Check the ingredient list carefully. Soils with slow-release fertilizer beads will cause severe ammonia spikes that can persist for weeks.
How long does a dirted tank substrate last?
A well-maintained dirted substrate can last 3 to 5 years or longer. Fish waste and organic detritus continuously replenish the nutrient supply. Unlike commercial aqua soil, which exhausts in 12 to 24 months, soil-based substrates are partially self-renewing.
Can I keep shrimp in a dirted tank?
Yes, once the tank is fully cycled and ammonia reads zero. Shrimp are sensitive to ammonia, so patience during the cycling period is essential. Many shrimp keepers run successful Walstad-style dirted tanks with Neocaridina and Caridina species.
What happens if soil gets exposed during maintenance?
Small exposures cause temporary cloudiness that clears with filtration. For larger breaches, add a thin layer of cap material over the exposed area. Avoid deep gravel vacuuming in dirted tanks, as it can pull soil through the cap. Surface-level siphoning only is the standard maintenance approach.
Is the capped soil method good for beginners?
It is beginner-friendly in terms of long-term maintenance (low fertilization needs, stable plant growth) but requires more careful setup than simply pouring in gravel or aqua soil. If you follow the preparation steps and are patient with the cycling period, it is one of the most rewarding and cost-effective substrate methods available.
Can I add root tabs to a dirted tank?
You can, but it is rarely necessary in the first 1 to 2 years. The soil provides more than enough nutrition for most plants. If specific heavy feeders show signs of nutrient deficiency after the first year, targeted root tab placement near those plants is the most efficient supplement.