Aquarium Lighting Guide: PAR, Spectrum & Optimization
Lighting is the engine of planted aquariums. It drives photosynthesis, determines growth rate, and sets the tempo of your entire system. This comprehensive guide covers everything from fundamental light science to advanced optimization techniques.
What you'll learn:
- Understanding PAR (what it is, why it matters, how to measure)
- Light spectrum and plant biology (which wavelengths matter)
- Calculating light requirements by tank size and depth
- Fixture selection (LED technology, features, brands)
- PAR distribution and coverage strategies
- Photoperiod optimization (duration, timing, ramp schedules)
- Light-CO₂-algae relationship
- Troubleshooting light-related problems
- Advanced techniques (dimming strategies, seasonal adjustments, automation)
Prerequisites: This guide assumes basic planted tank knowledge. For beginner-level lighting information, see How Much Light Do I Need?
Understanding PAR: The Gold Standard Metric
What Is PAR?
PAR (Photosynthetically Active Radiation): The portion of light spectrum (400-700 nm wavelength) that plants use for photosynthesis.
Measured in: µmol/m²/s (micromoles per square meter per second)
- Micromoles: Number of photons
- Per square meter: Area
- Per second: Rate
What it tells you: How many usable photons reach plants per unit area per unit time.
Why PAR Matters More Than Lumens or Watts
Lumens:
- Measures light as perceived by human eyes
- Human vision peaks at green (~550 nm)
- Plants use red and blue primarily
- Conclusion: Lumens are misleading for planted tanks
Watts:
- Measures electrical power consumption
- LED efficiency varies wildly
- 20W of efficient LED ≠ 20W of old LED
- Conclusion: Watts don't directly indicate plant-usable light
PAR:
- Measures actual photons in plant-usable spectrum
- Direct correlation to photosynthesis potential
- Universal standard regardless of technology
- Conclusion: Only reliable metric for planted tanks
PAR Ranges for Planted Tanks
Low light: 15-30 µmol/m²/s
- Easy plants only
- Slow growth
- No CO₂ needed
- Forgiving
Medium light: 30-50 µmol/m²/s
- Most plants grow well
- Moderate growth rate
- CO₂ helpful but optional
- Balanced approach
High light: 50-80 µmol/m²/s
- All plants thrive
- Fast growth
- CO₂ required
- Demanding (requires attention to balance)
Very high light: 80+ µmol/m²/s
- Competition-level growth
- CO₂ essential
- High nutrient demand
- Algae risk if imbalanced
The sweet spot for most hobbyists: 40-60 µmol/m²/s (medium to medium-high)
Light Spectrum and Plant Biology
The Photosynthesis Spectrum
Plants don't use all light equally. Photosynthesis is driven primarily by specific wavelengths.
Key Wavelengths
Red (630-700 nm):
- Peak absorption: 650-670 nm
- Chlorophyll A and B strongly absorb red light
- Drives photosynthesis (primary energy source)
- Promotes flowering and fruiting (less relevant underwater)
- Essential for all plant growth
Blue (400-500 nm):
- Peak absorption: 430-450 nm
- Chlorophyll A and B strongly absorb blue light
- Drives photosynthesis
- Promotes compact growth (shorter internodes in stems)
- Regulates plant morphology
- Essential for healthy development
Green (500-600 nm):
- Plants reflect green (why they appear green)
- Partially absorbed and used
- Penetrates deeper into leaf tissue than red/blue
- Useful but less critical than red/blue
Far-red (700-750 nm):
- Not traditionally considered PAR (beyond 700 nm)
- Influences plant morphology (shade avoidance response)
- Can promote stem elongation
- Advanced lighting consideration
McCree Curve (Photosynthesis Action Spectrum)
The McCree Curve shows relative photosynthetic efficiency by wavelength:
Peak efficiency:
- Red: ~650-670 nm
- Blue: ~430-450 nm
Moderate efficiency:
- Orange: 580-620 nm
- Cyan-green: 480-550 nm
Low efficiency:
- Deep blue: <420 nm
- Yellow-green: 550-580 nm
- Far-red: >700 nm
Practical implication: Lights with strong red and blue components maximize photosynthesis per watt.
Full Spectrum vs Targeted Spectrum
Full spectrum LED:
- Includes all wavelengths (white appearance)
- Mimics natural daylight
- Aesthetically pleasing
- Still emphasizes red and blue peaks
Targeted spectrum (red+blue only):
- Highly efficient for photosynthesis
- Purple/pink appearance (unappealing)
- Not recommended for display tanks
- Used in grow operations
Modern planted tank LEDs: Full spectrum with enhanced red and blue peaks (best of both worlds)
Measuring and Calculating Light Requirements
Using a PAR Meter
PAR meters: Devices that measure µmol/m²/s
Cost: $200-500 (Apogee MQ-500, Seneye Reef)
How to measure:
- Place sensor at substrate level
- Measure multiple points (center, corners, edges)
- Record readings
- Average them for overall PAR estimate
Most hobbyists don't own PAR meters. Borrow from local club, use manufacturer specs, or estimate based on fixture and depth.
Manufacturer Specifications
Many quality LED fixtures list PAR values:
Example specs:
- "45 µmol/m²/s at 12 inches"
- "60 PAR at 18 inches"
Use these as guidelines for fixture selection.
Calculating PAR by Depth
Light intensity decreases with depth according to inverse square law (approximately).
Rule of thumb: Every 6 inches of depth cuts light intensity roughly in half.
Example:
- PAR at surface: 100 µmol/m²/s
- PAR at 6": ~50 µmol/m²/s
- PAR at 12": ~25 µmol/m²/s
- PAR at 18": ~12-15 µmol/m²/s
This is approximate. Water clarity, surface agitation, and reflections affect actual values.
Estimating Light Needs by Tank Depth
Shallow tanks (≤12 inches):
- Easier to achieve high PAR
- Basic LEDs can reach medium-high light
- More efficient
Standard tanks (12-18 inches):
- Requires moderate LED output for medium light
- High-output LEDs needed for high light
Deep tanks (>18 inches):
- Difficult to achieve high PAR at substrate
- Requires powerful fixtures
- Light intensity drops significantly
Rimless vs rimmed:
- Rimless tanks lose ~10% less light (no plastic rim blocking)
- Slight advantage for light penetration
LED Technology for Planted Tanks
Why LED Over Other Technologies
Fluorescent (T5, T8) — Outdated:
- Lower efficiency
- Bulb replacement needed
- Heat output
- Limited spectrum control
Metal halide — Outdated:
- Very high heat output
- Expensive to run
- Overkill for most tanks
LED — Current standard:
- High efficiency (more PAR per watt)
- Long lifespan (5-10 years)
- Low heat output
- Adjustable (dimming, spectrum control in premium models)
- Compact form factor
All modern planted tanks use LED lighting.
LED Chip Technology
Chip types:
SMD (Surface-Mount Device):
- Standard LED technology
- Multiple small chips
- Even light distribution
- Most common
COB (Chip-on-Board):
- Many chips clustered together
- Very bright, focused light
- Can create hotspots (uneven PAR)
- Less common in aquarium lights
Quality indicators:
- Name-brand chips (Cree, Osram, Samsung)
- CRI (Color Rendering Index) >80 (makes colors look natural)
- Spectrum coverage (full spectrum with red/blue peaks)
Power and Efficiency
LED efficiency is measured in µmol/joule:
- Low efficiency: <1.5 µmol/J
- Moderate: 1.5-2.5 µmol/J
- High efficiency: 2.5-3.5 µmol/J
- Premium: >3.5 µmol/J
Higher efficiency = more PAR per watt = lower electricity cost + less heat
Modern quality fixtures: 2.0-3.0 µmol/J typical
Fixture Selection Guide
Entry-Level Fixtures ($30-80)
Examples:
- Nicrew ClassicLED
- Hygger Full Spectrum
- Aqueon OptiBright
PAR output: Low to moderate (20-40 µmol/m²/s at 12")
Features:
- Basic on/off
- Fixed spectrum
- No dimming
Best for:
- Low-tech tanks
- Beginners
- Budget-conscious setups
Limitations:
- Can't fine-tune intensity
- May not provide high light
- Basic build quality
Mid-Range Fixtures ($80-150)
Examples:
- Fluval Aquasky (adjustable models)
- Finnex Planted+ 24/7
- Hygger HyperReef
- Nicrew RGB+W
PAR output: Moderate to high (40-70 µmol/m²/s at 12")
Features:
- Adjustable intensity (dimming)
- Programmable timer
- Ramp up/down (gradual sunrise/sunset)
- Some spectrum control
Best for:
- Most hobbyists
- Flexibility in setup type
- Tanks that may transition low-tech to high-tech
Sweet spot: Best value for features and performance
Premium Fixtures ($150-400)
Examples:
- Chihiros WRGB II
- ONF Flat One+
- Twinstar LED
- ADA Solar RGB
- Kessil A360X Tuna Sun
PAR output: High (60-120+ µmol/m²/s adjustable)
Features:
- Full spectrum control (adjust R/G/B/W independently)
- Advanced scheduling (multiple ramp periods)
- Bluetooth/app control
- Very high build quality
- Aesthetic design (slim, elegant)
Best for:
- High-tech setups
- Competition aquascaping
- Hobbyists wanting full control
- Premium aesthetics
Worth the cost? If you're serious about planted tanks and want maximum flexibility, yes.
Fixture Size Matching
Length coverage: Fixture should cover at least 70-80% of tank length for even PAR distribution.
Examples:
- 24" tank → 18-24" fixture
- 36" tank → 30-36" fixture
- 48" tank → 42-48" fixture
Wider tanks: May need two fixtures for even coverage (especially on standard 12-13" wide tanks)
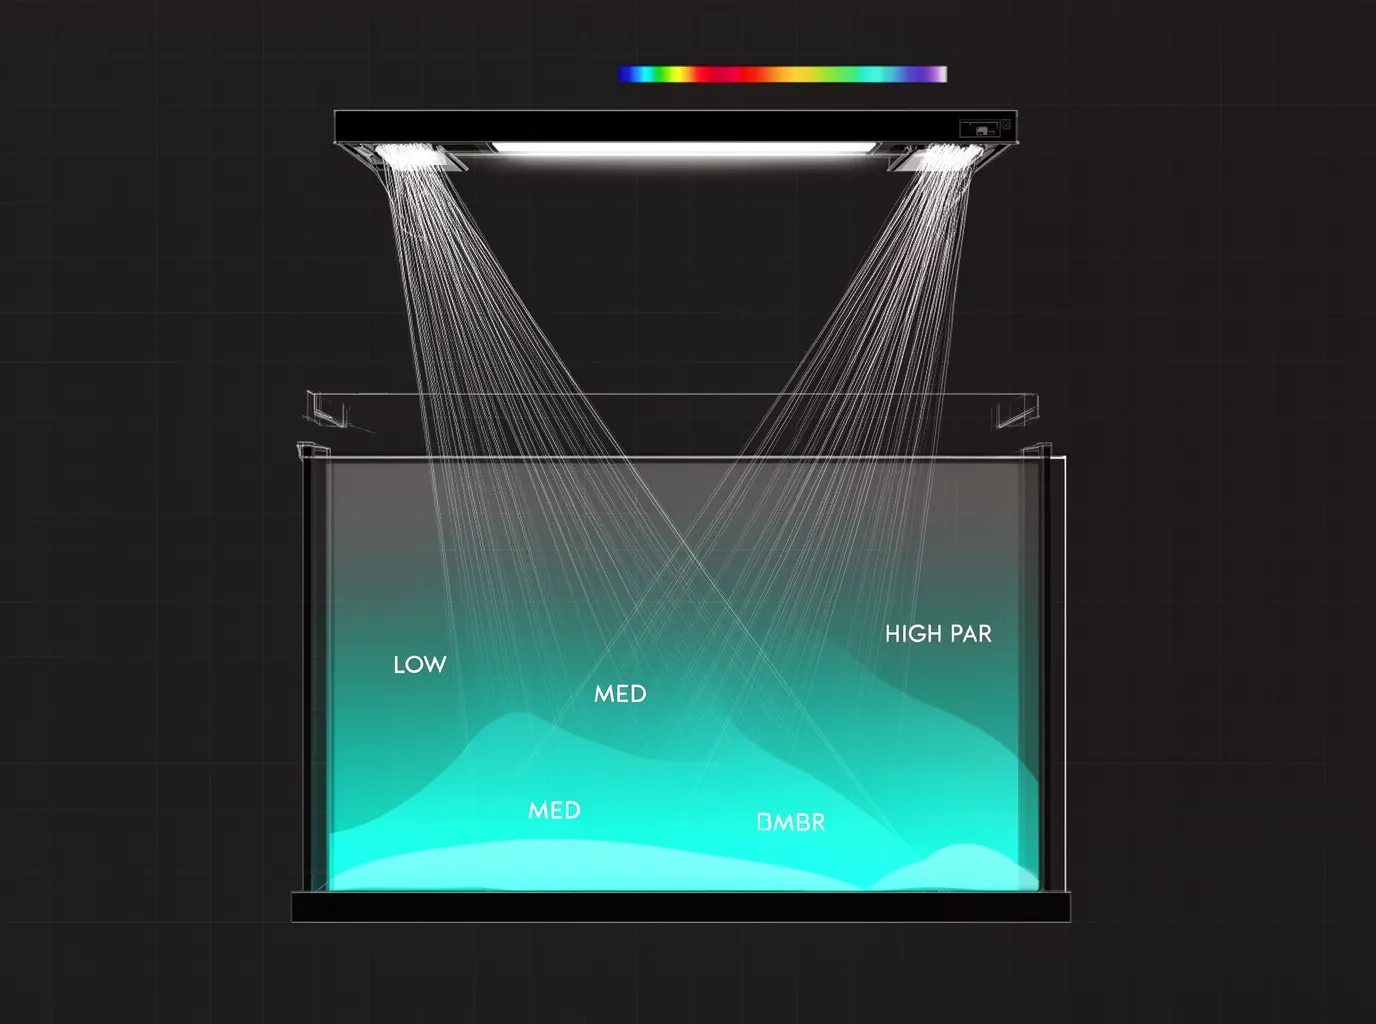
PAR Distribution and Coverage
The PAR Hotspot Problem
Most fixtures create a PAR hotspot directly beneath the fixture center, with PAR decreasing toward edges.
Example PAR distribution (36" fixture on 36" tank):
- Center: 60 µmol/m²/s
- 6" from center: 50 µmol/m²/s
- Corners: 30 µmol/m²/s
Result: Plants grow unevenly. Center plants thrive, corner plants struggle.
Strategies for Even PAR Distribution
1. Use appropriate fixture length (cover 80%+ of tank)
2. Mount higher above tank
- Increases coverage area
- Reduces peak intensity
- More even distribution
- Trade-off: Lower overall PAR
3. Use multiple fixtures
- Two smaller fixtures instead of one large
- Overlapping coverage
- More even distribution
- Higher cost
4. Use diffuser panels
- Frosted acrylic sheets below fixture
- Spreads light more evenly
- Reduces PAR slightly (10-15%)
- DIY option
5. Plant accordingly
- High-light plants in center
- Lower-light plants at edges
- Work with your fixture's characteristics
Measuring Your PAR Distribution
With PAR meter:
- Measure substrate PAR at 9 points (grid pattern)
- Record each value
- Map distribution
Without PAR meter:
- Plant growth rate indicates relative PAR
- Fast growth areas = high PAR
- Slow growth areas = low PAR
- Adjust plant placement accordingly
Photoperiod Optimization
Duration Fundamentals
Standard photoperiod: 6-8 hours
Why not longer?
- Plants have light saturation point (can only photosynthesize effectively for so long)
- Algae can exploit extended photoperiods more efficiently than plants
- Diminishing returns beyond 8-9 hours
- Extended light increases algae risk without proportional plant growth
Why not shorter?
- <6 hours may not provide sufficient photosynthesis for healthy growth
- Some slow-growing plants benefit from longer exposure
The sweet spot: 7-8 hours for most setups
Timing Considerations
Consistent daily schedule is critical:
- Same start time every day
- Same duration every day
- Use timer (never manual on/off)
Optimal timing:
- Morning/afternoon preferred (mimics natural cycle)
- Evening acceptable if viewing time is important
- Avoid split photoperiods initially (complicates troubleshooting)
Ramp-Up and Ramp-Down (Advanced)
Gradual transitions:
- Lights slowly increase intensity over 30-60 minutes (sunrise)
- Lights slowly decrease intensity over 30-60 minutes (sunset)
Benefits:
- More natural appearance
- Reduces fish stress
- May reduce algae slightly (theory)
Requires:
- Fixture with dimming capability
- Programmable controller
Necessity: Optional aesthetic feature, not required for plant health
Split Photoperiod (Siesta Method)
Schedule:
- 4 hours light → 2-3 hours dark → 4 hours light
Theory: Interrupts algae growth while plants continue photosynthesizing
Reality:
- Mixed results
- Some report success, others see no difference
- Adds complexity
Recommendation: Use standard continuous photoperiod. Only experiment with siesta if persistent algae despite balanced system.
Light Intensity and CO₂: The Critical Relationship
The Core Principle
Light intensity determines CO₂ demand.
Low light (20-30 PAR):
- Slow photosynthesis
- Low CO₂ demand (2-5 ppm natural levels sufficient)
- No CO₂ injection needed
Medium light (40-60 PAR):
- Moderate photosynthesis
- Moderate CO₂ demand (10-15 ppm helpful)
- CO₂ recommended but optional
High light (60-80+ PAR):
- Fast photosynthesis
- High CO₂ demand (20-30 ppm required)
- CO₂ injection essential
Mismatch = algae:
- High light + Low CO₂ = Plants CO₂-limited, algae exploits unused light/nutrients
- Low light + High CO₂ = Wasted CO₂, minimal benefit
Adjusting Light to Match Your System
No CO₂ → Low to moderate light maximum
CO₂ injection → Match light intensity to CO₂ availability
If adding CO₂ to existing tank:
- Can increase light intensity gradually over 2-4 weeks
- Monitor for algae (sign of imbalance)
- Increase fertilization to match faster growth
If removing CO₂ from high-tech tank:
- Must reduce light intensity
- Otherwise guaranteed algae outbreak
Light and Algae: Managing the Relationship
How Light Fuels Algae
Algae, like plants, photosynthesize. Light provides energy.
When algae dominates:
- Light available
- Nutrients present
- Plants can't use resources efficiently (CO₂ limited, nutrient deficiency, or imbalance)
- Algae fills the gap
Prevention: Ensure plants can photosynthesize efficiently at given light level.
Light-Related Algae Triggers
Too much light intensity:
- Exceeds plant's ability to use even with adequate CO₂/nutrients
- Solution: Reduce intensity
Too long photoperiod:
-
9 hours increases algae risk
- Solution: Reduce to 7-8 hours
Inconsistent schedule:
- Variable photoperiod confuses plant adaptation
- Solution: Timer, same schedule daily
Light + other imbalances:
- Light + low CO₂ = BBA, staghorn
- Light + low phosphate = GSA
- Light + low nitrate + poor flow = cyano
Fixing light-related algae:
- Reduce photoperiod to 6 hours temporarily
- Address underlying imbalance (CO₂, nutrients, flow)
- Gradually return to 7-8 hours once resolved
Troubleshooting Light-Related Problems
Problem: Plants Growing Poorly Despite Adequate Light
Possible causes:
- CO₂ insufficient (if moderate to high light)
- Nutrient deficiency
- Light spectrum poor (rare with quality LEDs)
Diagnosis:
- Check CO₂ with drop checker
- Test nitrate (10-20 ppm) and phosphate (1-2 ppm)
- Verify fixture is full spectrum
Solution:
- Address limiting factor (usually CO₂ or nutrients, rarely light itself)
Problem: Excessive Algae Despite Moderate Light
Possible causes:
- CO₂ inconsistent
- Nutrients imbalanced
- Photoperiod too long
- Poor water circulation
Solution:
- Reduce photoperiod to 6-7 hours temporarily
- Stabilize CO₂ (if using)
- Ensure nutrients adequate (don't starve plants)
- Improve flow
Problem: Plants Stretching (Leggy Growth)
Cause: Insufficient light intensity
Symptoms:
- Long internodes (space between leaves on stems)
- Pale coloration
- Plants leaning toward light source
- Slow growth
Solution:
- Increase light intensity
- Verify fixture appropriate for tank depth
- Lower fixture closer to water surface
- Upgrade fixture if needed
Problem: Plants Bleaching (Pale, Washed Out)
Cause: Excessive light intensity
Symptoms:
- Pale, almost white new growth
- Loss of green coloration
- Stunted appearance despite high light
Solution:
- Reduce intensity (dim if possible)
- Raise fixture higher above tank
- Reduce photoperiod slightly
Problem: Uneven Plant Growth
Cause: Uneven PAR distribution
Observation:
- Center plants thrive, edge plants struggle
- One side grows faster than other
Solution:
- Add second fixture
- Raise fixture for broader coverage (reduces peak PAR)
- Plant high-light species in high-PAR areas, low-light species in low-PAR areas
Problem: Red Plants Staying Green
Cause: Insufficient light + CO₂
Requirement for red coloration:
- High light (60-80+ PAR)
- CO₂ injection (20-30 ppm)
- Adequate iron and micronutrients
If light is high but plants still green:
- Check CO₂ levels
- Verify iron in fertilizer
- Some species need very high light (80-100+ PAR)
Advanced Lighting Techniques
Dimming Strategies
Why dim?
- Fine-tune intensity to exact plant needs
- Reduce algae risk
- Lower electricity costs
- Extend LED lifespan
When to dim:
- Initial setup (start 50%, increase gradually)
- After algae outbreak (reduce temporarily)
- Seasonal adjustment (less light in winter if needed)
How to implement:
- Use fixture with built-in dimming
- Use external dimmer (if compatible)
- Adjust mounting height (non-electronic dimming)
Scheduled Dimming (Cloud Effect)
What it is: Programmed intensity variations throughout photoperiod
Example schedule:
- 0-30 min: Ramp 0% → 100%
- 30 min - 6.5 hrs: 100%
- 6.5-7 hrs: Ramp 100% → 0%
Advanced variation:
- Midday intensity reduction (simulates cloud cover)
- Theory: Reduces algae, doesn't harm plants
- Reality: Marginal benefit, aesthetic feature
Requires: Premium fixture with advanced programming
Moonlight Simulation
What it is: Very dim blue/white light overnight
Claimed benefits:
- Aesthetic (nice to look at)
- Fish spawning behavior (some species)
- Nocturnal fish observation
Plant benefit: None (too low intensity)
Safety consideration: Plants produce no oxygen at night. Ensure adequate aeration if using moonlight + CO₂.
Seasonal Light Adjustment
Theory: Reduce intensity/duration in winter, increase in summer (mimics natural seasonal variation)
Benefit: Minimal. Stable year-round lighting works fine.
When it makes sense:
- Room receives significant natural light (ambient light affects tank)
- Attempting to trigger spawning in seasonal breeders
For most aquarists: Maintain consistent lighting year-round
Maintaining and Upgrading Fixtures
LED Lifespan
Typical lifespan: 5-10 years before significant PAR degradation
Degradation curve:
- Years 1-3: Minimal PAR loss (<5%)
- Years 3-5: Gradual decline (5-15% loss)
- Years 5-10: Noticeable decline (15-30% loss)
Signs of aging:
- Plants growing slower despite same settings
- Need to increase intensity over time
- Visible dimming
When to replace: When PAR insufficient for plant needs despite maxing intensity
Cleaning and Maintenance
Dust accumulation:
- Dust on fixture reduces PAR output (10-20% loss possible)
- Wipe fixture every 1-2 months
- Use soft cloth (don't scratch lenses/diffusers)
Salt creep (from evaporation):
- Accumulates on fixture over time
- Can corrode electronics
- Clean monthly if splashing occurs
Mounting brackets:
- Check tightness periodically
- Ensure fixture secure
Upgrading Strategy
When to upgrade:
- Current fixture insufficient for plant goals
- Transitioning from low-tech to high-tech
- Adding dimming/control capability
- Fixture failure
Upgrade path:
- Low-tech → Mid-range adjustable LED (adds flexibility)
- Mid-range → Premium (better control, higher PAR)
Don't constantly upgrade: Once you have adequate PAR, focus on system balance instead.
Cost and Energy Efficiency
Purchase Costs
Budget: $30-80 Mid-range: $80-150 Premium: $150-400+
Value consideration: Mid-range fixtures ($100-150) offer best balance of features, quality, and cost for most aquarists.
Operating Costs
Power consumption:
- Small tanks (10-20 gal): 10-25W
- Medium tanks (20-55 gal): 25-50W
- Large tanks (55-120 gal): 50-100W+
Cost calculation:
- 30W fixture × 8 hrs/day × 365 days = 87.6 kWh/year
- At $0.12/kWh = $10.51/year
- Negligible cost for most setups
LED efficiency advantage: LEDs use 50-75% less power than equivalent T5/T8 fluorescent for same PAR output.
Long-Term Value
LED advantages:
- No bulb replacements (unlike fluorescent)
- Low operating cost
- 5-10 year lifespan
Total cost of ownership over 10 years:
- Budget LED: $80 + $105 electricity = $185
- Premium LED: $300 + $105 electricity = $405
Difference: $220 over 10 years for significantly better features, build quality, and performance.
Worth it? For serious hobbyists, yes.
FAQ
Do I need a PAR meter?
For most hobbyists: No. Use manufacturer specs, observe plant response, and adjust accordingly.
Worthwhile if: Active in multiple planted tanks, helping others with setups, or want precise data. Borrow from local aquarium club if available.
Can I use shop lights or desk lamps?
Possible, but not recommended:
- Often poor spectrum for plants
- Not water-resistant (safety hazard)
- Difficult to mount securely
- Dedicated aquarium LEDs are affordable and purpose-built
How do I know if my light is too strong?
Signs:
- Excessive algae despite good maintenance
- Plants bleaching (pale coloration)
- Green spot algae on everything
- Fish avoiding top of tank
Solution: Reduce intensity, duration, or raise fixture higher
Does light color (kelvin) matter?
Kelvin (color temperature):
- 6500K: Neutral white (daylight)
- 8000K: Cool white (slight blue tint)
- 10000K+: Very blue (marine aesthetic)
For plants: 6500-8000K works well. Kelvin is visual appearance, not spectrum. Focus on full spectrum with red/blue peaks.
Should I use actinic (blue) lighting?
Actinic lighting: Deep blue, used in marine tanks for coral fluorescence
For planted freshwater: No benefit. Use full spectrum white light with enhanced red/blue.
Can I grow plants with just sunlight?
Theoretically yes, but:
- Uncontrollable (varies by season, weather, time of day)
- Almost always causes excessive algae
- Not recommended
Use artificial lighting only for planted tanks.
Related Guides
Foundation:
Related Systems:
Specific Lighting Topics:
Final Principles
1. PAR is the only metric that matters. Forget lumens and watts. Measure or estimate PAR at substrate level.
2. Match light to CO₂ availability. High light requires CO₂ injection. No CO₂ = low to moderate light only.
3. Consistency beats intensity. Stable 7-8 hour photoperiod works better than 12 hours of variable timing.
4. More isn't always better. Excessive light causes algae and plant stress. Find the minimum intensity that meets your goals.
5. Distribution matters as much as intensity. Even PAR coverage creates even plant growth. Hotspots cause problems.
6. Quality fixtures are worth the investment. Mid-range to premium LEDs provide flexibility, longevity, and control. Budget lights work but limit options.
7. Observe and adjust. Plants tell you if light is adequate (healthy growth) or excessive (algae, bleaching). Trust their feedback.
Lighting isn't just about brightness — it's about providing the right amount of usable light, at the right duration, with the right distribution. Master lighting, and you master your planted tank's growth rate and health.